 Alban Diquet
12 KiB
Getting Started
Adding TrustKit to an App can be achieved through the following steps:
- Generating SSL pins for the App's server endpoints and choosing a pinning policy.
- Adding TrustKit as a dependency to the App's Xcode project.
- Initializing TrustKit with the pinning policy.
Warning
Public key pinning can be dangerous and requires more than just code-level changes in your App. If you make a mistake, you might cause your App to pin a set of keys that validates today but which stops validating a week or a year from now, if something changes. In that case, your App will no longer be able to connect to its servers and will most likely stop working, until it gets updated with a new set of pins.
Unless you are confident that you understand the Web PKI that you can manage the App servers' cryptographic identity very well, you should not use key pinning.
Generating SSL Pins
Before deploying SSL pinning within your App, you first need to investigate and choose which domains and public keys need to be pinned. This is very important as enabling the wrong pinning policy may prevent your App from being able to connect to its servers, when the servers' keys are rotated.
The following blog post provides some information on which keys to pin and what the trade-offs are: https://noncombatant.org/2015/05/01/about-http-public-key-pinning/.
In the context of TrustKit, an SSL pin is the base64-encoded SHA-256 of a certificate's Subject Public Key Info; this is the same as what is described in the HTTP Public Key Pinning specification.
To generate such values, a Python helper script is available within the project's repository; it can be used to generate the pin configuration from a PEM or DER certificate:
$ python get_pin_from_certificate.py ca.pem
$ python get_pin_from_certificate.py --type DER ca.der
Deploying TrustKit
Adding TrustKit as a Dependency - CocoaPods
The easiest way to deploy TrustKit in an App is via CocoaPods. To do so, add the following line to your Podfile:
pod 'TrustKit'
Then run:
$ pod install
If CocoaPods cannot be used, TrustKit can be added to an Xcode project manually; instructions on how to do so are available at the end of this guide.
Configuring a Pinning Policy
Enabling TrustKit within an App requires generating a pinning policy and then initializing TrustKit with this policy. There are two different ways to supply a pinning policy to TrustKit:
-
By adding configuration keys to the App's Info.plist file under a
TSKConfigurationdictionary key: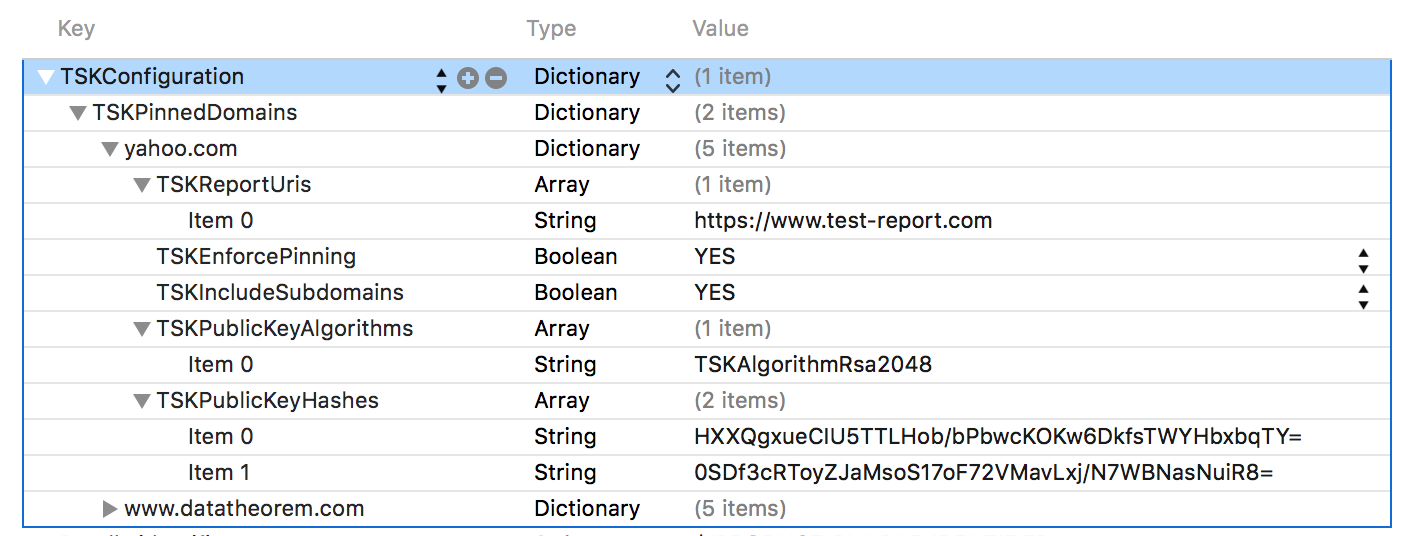
-
Programmatically, by calling the
initializeWithConfiguration:method with your pinning policy.
A pinning policy is a dictionary of domain names and pinning configuration keys. At a minimum, the configuration should specify a list of SSL pins and the corresponding certificates' public key algorithms. For example:
#import <TrustKit/TrustKit.h>

NSDictionary *trustKitConfig =
@{
  // Auto-swizzle NSURLSession and NSURLConnection delegates to add pinning validation
  kTSKSwizzleNetworkDelegates: @YES,

  // The list of domains we want to pin and their configuration
  kTSKPinnedDomains: @{

          @"yahoo.com" : @{
                  // Pin all subdomains of yahoo.com
                  kTSKIncludeSubdomains:@YES,

                  // Do not block connections if pinning validation failed so the App doesn't break
                  kTSKEnforcePinning:@NO,

                  // Send reports for pin validation failures so we can track them
                  kTSKReportUris: @[@"https://some-reporting-server.com/log_report"],

                  // The pinned public keys' algorithms
                  kTSKPublicKeyAlgorithms : @[kTSKAlgorithmRsa4096],

                  // The pinned public keys' Subject Public Key Info hashes
                  kTSKPublicKeyHashes : @[
                          @"TQEtdMbmwFgYUifM4LDF+xgEtd0z69mPGmkp014d6ZY=",
                          @"rFjc3wG7lTZe43zeYTvPq8k4xdDEutCmIhI5dn4oCeE=",
                          ],
                  },

          @"www.datatheorem.com" : @{
                  // Block connections if pinning validation failed
                  kTSKEnforcePinning:@YES,

                  kTSKPublicKeyAlgorithms : @[kTSKAlgorithmRsa2048],

                  kTSKPublicKeyHashes : @[
                          @"HXXQgxueCIU5TTLHob/bPbwcKOKw6DkfsTWYHbxbqTY=",
                          @"0SDf3cRToyZJaMsoS17oF72VMavLxj/N7WBNasNuiR8="
                          ]
                  }}};
Consider leveraging auto-swizzling for simple Apps
By setting kTSKSwizzleNetworkDelegates to YES, TrustKit will perform method
swizzling on the App's NSURLSession and NSURLConnection delegates in order
to automatically perform SSL pinning validation against the server's certificate
chain, based on the configured pinning policy. This allows deploying TrustKit
without changing the App's source code.
Auto-swizzling should only be enabled for simple Apps, as it may not work properly in several scenarios including:
- Apps with complex connection delegates, for example to handle client authentication via certificates or basic authentication.
- Apps where method swizzling is already performed by another module or library (such as New Relic).
- Apps that do no use
NSURLSessionorNSURLConnectionfor their connections.
Auto-swizzling can be disabled by setting kTSKSwizzleNetworkDelegates to NO
(which is also the default setting). Manual pinning validation can then be easily
implemented in the App's authentication handlers'; see the "Manual Pin Validation"
section in this guide for instructions.
Always start with pinning enforcement disabled
To avoid locking out too many users from your App when deploying SSL pinning
for the first time, it is advisable to set kTSKEnforcePinning to NO, so that SSL
connections will succeed regardless of pin validation. This means that TrustKit
will mirror iOS' default behavior.
Deploy a reporting server or use Data Theorem's free server
Adding a report URL using the kTSKReportUris setting to receive pin validation
failure reports will help track pin validation failures happening across your user
base. You can use your own report server or Data Theorem's, which provides a
dashboard to display these reports for free (email info@datatheorem.com for
access).
This will give you an idea of how many users would be blocked, if pin validation was to be enforced.
Other configuration settings
The list of all the configuration keys is available in the documentation.
Manual Pin Validation
Even when auto-swizzling is enabled with kTSKSwizzleNetworkDelegates, there
are specific scenarios where TrustKit cannot intercept outgoing SSL connections
and automatically validate the server's identity against the pinning policy. For these
connections, the pin validation must be manually triggered: the server's trust object,
which contains its certificate chain, needs to be retrieved or built before being
passed to the
TSKPinningValidator class
for validation.
TSKPinningValidator then returns a TSKTrustDecision which describes whether
the SSL connection should be allowed or blocked, based on the App's SSL pinning
policy.
The following connections require manual pin validation:
- All connections within an App that disables TrustKit's network delegate
swizzling by setting the
kTSKSwizzleNetworkDelegatesconfiguration key toNO. - Connections that do not rely on the
NSURLConnectionorNSURLSessionAPIs:- Connections leveraging different network APIs (such as
NSStream). Apple has released a [technical note describing how the server's trust object can be retrieved][https://developer.apple.com/library/ios/technotes/tn2232/_index.html] for the various network APIs (NSStream,CFNetwork, etc.) available on iOS and OS X. - Connections initiated using a third-party SSL library such as OpenSSL. The server's trust object needs to be built using the received certificate chain.
- Connections leveraging different network APIs (such as
- Connections happening outside of the App's process:
WKWebViewconnections: the server's trust object can be retrieved and validated within thewebView:didReceiveAuthenticationChallenge:completionHandler:method.NSURLSessionconnections using the background transfer service: the server's trust object can be retrieved and validated within theapplication:handleEventsForBackgroundURLSession:completionHandler:method.
Pinning in WebViews
Adding SSL pinning to connections initiated within a UIWebView is difficult as the
class does not provide direct APIs to handle authentication challenges. As
mentionned in Apple's technical note about HTTPS trust evaluation,
customizing certificate validation in a UIWebView can still be achieved using
NSURLProtocol to intercept all outgoing connections. However, implemeting this
technique is a complex and significant engineering effort.
Overall, the best approach to implementing SSL pinning in webviews is by
migrating to the WKWebView class introduced in iOS 8, which provides
delegate methods to handle authentication challenges (such as server SSL certificate
validation). However, this approach still requires some testing as it seems like the
webView:didReceiveAuthenticationChallenge:completionHandler: delegate method only works reliably on iOS 9.
Embedding TrustKit Without CocoaPods
Adding TrustKit as a Dependency - Static Linking
If CocoaPods can't be used and for Apps targeting iOS 7, TrustKit can be statically linked.
-
Drag and drop the TrustKit Xcode project file in your project:

-
Within the "General" tab for your App's target, add libTrustKit_Static.a to the "Linked Framework and Binaries" section:

-
Within the "Build Settings", add TrustKit's folder to the "User Header Search Paths" setting and set "Always Search Header Paths" to "Yes":

-
Add
-ObjCto the to the "Other Linker Flags" parameter within the App's Build Settings. -
Lastly, initialize TrustKit with your pinning policy.
Adding TrustKit as a Dependency - Dynamic Linking
If CocoaPods can't be used and for Apps targeting iOS 8+ or OS X, TrustKit can be dynamically linked.
-
Drag and drop the TrustKit Xcode project file in your project:
-
Within the "General" tab for your App's target, add TrustKit to the "Embedded Binaries" section:

-
Lastly, initialize TrustKit with your pinning policy.